close
新的Mac OS又推出了,想當然每次推出更新前都要製作一下USB以備不時之需,基本上做法跟前一版沒什麼變化,注意名字和路徑就可以了!
P.S. 這次有記得截圖了XDDD
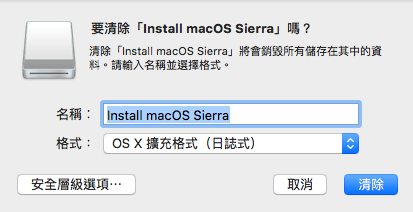
Step 1. You need to make USB to one GUID partition first. (先把USB重新格式化,並且選擇分割為GUID的磁區),Chose Mac OSX Journal format. (分割的磁區檔案格式選擇 OSX 日記式)


Step 2. Open Terminal Command Line, then type the command below. (打開終端機的命令輸入介面,並且輸入以下指令)
sudo /Applications/Install\ macOS\ Sierra.app/Contents/Resources/createinstallmedia --volume /Volumes/Install\ macOS\ Sierra/ --applicationpath /Applications/Install\ macOS\ Sierra.app/ --nointeraction

Step 3. Finished. (等系統跑完就好了XD)

/Volumes/Install\ macOS\ Sierra/
P.S. The red part of the command line means you have to change the name of USB by your own device. (指令紅字的部分請根據你的USB掛載名字做更換!
文章標籤
全站熱搜


 留言列表
留言列表
